


Table of Contents
ToggleA new Call of Duty map just dropped, and the multiplayer landscape is shifting. Whether you’re grinding ranked matches or preparing for competitive tournaments, understanding the layout and meta strategies can mean the difference between dropping 30 kills and getting spawn-trapped. This guide breaks down everything you need to master the newest arena: from hotspot locations to optimal loadouts, rotation routes to advanced competitive tactics. By the end, you’ll know this map better than the developers who built it.
Key Takeaways
- Master the new Call of Duty map’s three main lanes—left flank for SMGs, center marketplace for ARs, and right sniper corridor—to control map flow and secure early-round momentum.
- Secure the center marketplace flag in objective modes like Domination to establish dominant positioning, as teams controlling this zone typically win matches through superior rotations and defensive depth.
- Use rotation routes strategically: the underground tunnel for safe late-round rotations, the marketplace for fast early pushes, and the perimeter path when playing from behind.
- Equip assault rifles paired with smoke grenades to counter the map’s long sightlines; communication and specific location callouts trump generic radio chatter in competitive play.
- Learn spawn prediction and map control techniques to avoid spawn traps; competitive teams establish default positioning that pressures multiple lanes simultaneously while funnel enemies into predictable chokepoints.
Map Overview And Design Philosophy
The new Call of Duty map is built around verticality and lane-based gameplay. Unlike some previous designs that felt chaotic and random, this layout enforces clear decision-making: you choose a lane, commit to it, or adapt mid-round based on team spawns and enemy positioning.
The map spans roughly 90×85 meters, making it medium-sized, perfect for 6v6 and 12v12 modes without excessive running time. Three main lanes dominate the flow: a left flank favoring SMGs and aggressive close-quarters combat, a central power position ideal for ARs and medium-range engagements, and a right-side sniper corridor for long-sight engagement. The design philosophy prioritizes accessibility for newcomers while offering depth for competitive players.
Sightlines are predictable enough to learn in a few matches but complex enough to reward map knowledge. Cover varies from destructible environmental objects to static structures, meaning your spawning weapons and initial positioning matter more here than in some other recent maps. The developers intentionally reduced common headglitch spots that plagued earlier titles, so precision and awareness trump cheap angles.
Layout And Key Locations
Understanding the map’s geography is step one. Here’s where engagements happen and why each zone matters.
High-Traffic Hotspots
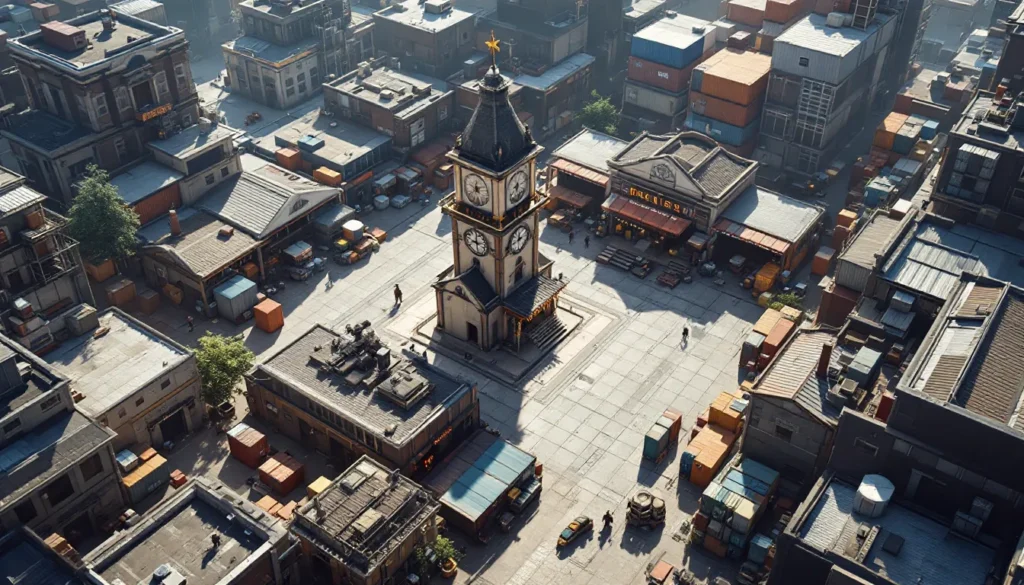
The central marketplace is the most contested area. Two teams naturally gravitate here because it controls both the map’s rotational flow and objective spawns in modes like Domination. The marketplace features a mix of tight corridors and open courtyard space, making it lethal for both run-and-gun players and those who favor cover-to-cover positioning.
The eastern warehouse attracts aggressive players and teams hunting for quick engagements. Multiple shipping containers provide vertical advantages, and the zone has few long-sightlines, so assault rifles and SMGs dominate here. Spawn predictability means whichever team secures this area early often controls early-round momentum.
The western residential block offers a chaotic mid-range environment. Buildings provide interior cover, rooftop access enables ambushes, and the tight pathways create opportunities for tactical team play. Players rotating through here need situational awareness, it’s easy to get flanked if you’re not communicating with teammates.
Sniper Nests And Long Sightlines
Competitive and hardcore players immediately identify sniper positions. The northern overlooking platform gives unobstructed views down the central lane and into the marketplace courtyard. A dedicated sniper here can suppress an entire flank, but the position is exposed from the sides, team protection is mandatory.
The southern cliff edge offers long-range engagement potential across the full map width. It’s less defensible than the northern position but harder to predict. Experienced snipers use this spot to catch rotations off-guard.
Both sniper positions have roughly a 3-4 second sight acquisition time if you’re not pre-aiming, making first-shot accuracy critical. Cover immediately behind snipers is limited, so their survival depends on team support or quick repositioning. This is why Call of Duty Spawn: emphasizes spawn prediction, knowing where enemies spawn helps snipers preposition for picks before rotations begin.
Safe Rotation Routes
Not every path is created equal. The underground tunnel system connecting the western and eastern halves is your safest rotation route. It’s exposed to grenades and flashbangs if enemies are listening, but it minimizes risk from long-sightline weapons and sniper fire. Most competitive teams use this for late-round rotations when map control shifts.
The central marketplace route is fastest but most dangerous, you’re exposed in the open for roughly 8-12 seconds depending on starting position. Use it early when spawn assumptions favor your team, or late when you know enemy positions from kills and intel.
The perimeter path hugging the map edges is slower but offers maximum cover. Smart players use it when playing from behind or rotating to deny predictable routes. It costs time but gains safety, a worthy trade when you’re one round away from closing out a match.
Game Mode Strategies
Strategy shifts dramatically based on game mode. Here’s how to adapt.
Team Deathmatch Tactics
TDM is pure gunplay, but this map’s structure matters. Most winning teams establish control of the marketplace early, then use it as a base for rotations and cutoffs.
Early round strategy: Spawn as a 6-person unit. Move two players down the left lane (residential), two through the center (marketplace), and two down the right (warehouse and sniper corridor). This split puts pressure on three lanes simultaneously and lets you gauge enemy positioning from contact. Whichever lane meets least resistance gets reinforced.
Mid-round adaptation: By 10-15 kills in, you know rough enemy positions. Consolidate map control. If enemies are passive, push into their half aggressively. If they’re aggressive, fall back to defensive positions near your spawn and let them come to you, the map’s cover favors defenders.
Late-round execution: The final 5-10 kills often come down to economy and ability positioning. Save killstreaks for rotations where you expect enemy pushes. Use tactical grenades to flush weak positions. Headshot accuracy wins here: extended engagements go to whoever has better aim and ping.
Search And Destroy Positioning
S&D fundamentally changes map strategy because bomb sites and defensive positions matter more than raw gunplay.
Site A is in the northeastern warehouse section. The site features one primary entry (the main door) and two secondary entries (window and side corridor). Defenders plant behind shipping containers for cover. Attackers need smoke grenades to block sightlines and flank through the window simultaneously. This site favors defenders by roughly 55-45 in round economics, planting is possible but requires coordination.
Site B sits in the southwestern marketplace courtyard. It’s more open than Site A, making plants riskier. But, it offers more cover for post-plant defense and multiple rotation routes for flanking teams. Attackers favor this site because utility counts more than pure positioning.
Winning S&D teams ban the same two defending routes (usually underground tunnel and left flank) to eliminate randomness. The team that controls rotations and predicts defenses wins rounds consistently. This is where Call of Duty Spec principles apply, communication and timing trump individual skill.
Domination Objective Control
Domination spawns three flags: A in the warehouse, B in the marketplace, and C in the residential block. Smart teams focus on two-flag control rather than pushing for all three.
Standard winning strategy: Spawn teams rush either A+B or B+C simultaneously. Controlling the center (B) is non-negotiable, it’s the hardest flag to dislodge once held. Teams that secure B within 20 seconds usually win because they can defend it with 3-4 players while the remaining teammates contest the second flag.
Counter-play: If enemies establish B control early, don’t commit to a futile re-take. Instead, secure the opposite flag (if they have A+B, take C and defend it). Play for ticket bleed. Eventually, they’ll overextend trying to three-cap, and that’s when you capitalize. Domination isn’t about kills, it’s about positioning discipline and flag pressure management.
Best Weapons And Loadouts
The meta for this map leans toward mid-range AR dominance with SMG presence in close quarters. Here’s what works.
Weapon Classes For This Map
Assault Rifles dominate the meta. The XM4 (or equivalent 5.56 AR in your game version) excels at 20-40 meter engagements, exactly the distance the marketplace and warehouse demand. Pair it with a red dot or 1x variable scope for flexibility. TTK (time-to-kill) sits around 550ms to the head at range, making precision valuable but not mandatory.
The AK-74 style AR offers higher recoil but more per-shot damage. It rewards precision, especially in S&D where engagements are staggered. If you’re confident in your aim, this gun punishes sloppy players hard.
SMGs shine in the residential block and anywhere enemies cluster. The GPMG-7 or equivalent fast-firing SMG achieves sub-300ms TTK inside 10 meters. Pair it with a pistol for longer-range encounters. Teams with strong SMG discipline create chaos in close-quarter zones and force rotations.
Sniper Rifles: Only viable if your team’s AR players pressure lanes and create space. A dedicated sniper with team support generates 15-20% additional kills through the setup their presence creates. Solo snipers feeding free kills lose games, context matters.
Tactical Rifles (lever-actions, bolt-actions in semi-auto mode) occupy a weird middle ground. They’re not terrible, but they’re outclassed by ARs at range and SMGs up close. Avoid unless you’re extremely confident.
Recommended Perks And Equipment
Perk selection directly impacts rotations and survivability. Cold Blooded (invisibility to killstreaks and thermal) is nearly mandatory for this map because the marketplace’s open space makes you vulnerable to airstrikes. Overkill (extra ammunition) matters if you’re not near ammo spawns, the warehouse and northern areas have poor ammo availability compared to other zones. Double Time (faster movement) feels mandatory for roaming players who rely on rotations and catching rotations.
Equipment-wise, flash grenades and smoke grenades directly counter this map’s sightlines. A well-placed smoke in the marketplace instantly neutralizes sniper pressure and forces engagements into closer ranges where your AR or SMG excels. Tactical grenades (stun, concussion) excel in the residential block where tight corridors amplify their effectiveness. Thermite grenades handle camped positions in the warehouse.
More competitive teams gravitate toward lethal grenades over tactical. Standard frags clear positions, and semtex sticks to structures, use them to deny room holding in late-round S&D. The Call of Duty Tournament showcased this perfectly: teams that controlled grenade resources controlled rounds.
Specialist equipment like C4 works in Domination for creative flag plays but isn’t viable in competitive S&D. Lethal grenades are simpler and more reliable.
Hidden Secrets And Easter Eggs
Every Call of Duty map hides little details that reward exploration. This one’s no exception.
The marketplace clock tower is interactable. Shooting it at specific times triggers a sound effect, nothing major, but it’s a fun detail developers included. Some players claim it affects audio cues nearby, but that’s unconfirmed speculation.
The warehouse’s eastern wall has a mural depicting a famous Call of Duty moment from the Black Ops series. It’s purely cosmetic, but it hints at the map’s lore and setting. Sharp-eyed players notice these connections: they don’t provide gameplay advantages but add immersion.
Below the northern sniper platform, a hidden room contains weapon blueprints, cosmetic skins rather than gameplay advantages. Finding it is difficult: you need to crouch-walk through a specific corner and jump through an opening. Completionists love finding these, and TikTok/YouTube creators milk these moments for content.
TheseEaster eggs matter less in competitive play, but they reward casual players who explore. Maps are more engaging when they feel like actual locations rather than generic arenas.
Advanced Tips For Competitive Play
This section separates casual from competitive mentality. Here’s what separates strong teams from great ones.
Map Control And Spawn Knowledge
Competitive teams don’t just play the map, they control it. Spawn knowledge means understanding exactly where enemies will appear based on your team’s positioning, prior kills, and current map state. The system is predictable: if you’re holding the marketplace, enemies don’t spawn nearby: they spawn at distant locations. Leverage this.
First-round default: Most teams establish a standard first-round positioning. For this map, that’s usually four players securing B flag/marketplace while two rotate right toward the warehouse. This spread pressures two lanes immediately. Second-round adjustments depend on first-round kills and economy.
Spawn trapping: Advanced teams intentionally spawn-trap weak opponents by controlling rotations and cutoff points. If enemies are spawning at the western residential block, position two players at the marketplace exit and two more at the underground tunnel entrance. This funnels them into one or two chokepoints. Most inexperienced teams break psychologically when spawned directly into enemies.
The Call of Duty for has excellent graphics that make recognizing spawn locations visually easier, a small advantage for competitive play.
Team Communication And Call-Outs
Vocal communication separates winning teams from losing ones. Generic callouts like “left” or “right” are useless, they’re directional noise. Strong teams use specific location names and directional callouts together.
Example callouts:
- “Two marketplace, near the fountain, one rotating underground”
- “Warehouse second floor, window angle, prepped with grenades”
- “Sniper north platform, lined up on main street”
Every piece of intel matters. If you see an enemy, call out their exact position, what weapon they’re holding, and where they’re facing. Teammates adapt based on that granularity. Teams that callout vaguely lose information fidelity, their opponents exploit the uncertainty.
Pinging and minimizing call-volume: Not every piece of information needs verbal callout. Modern games feature ping systems: use them for non-urgent positional info. Save voice comms for time-sensitive callouts: “rotate now,” “enemy flanking left,” “plant down.”
Professional teams use shorthand developed through practice: “Hold B, two truck,” means “defend the B flag: watch two enemies near the truck-shaped cover.” This economy of language reduces confusion and response time. Records from esports coverage on Dexerto show top teams average 4-5 crucial verbal callouts per 30-second round window, tight, efficient communication.
New players overthink callouts. Start with location name + number of enemies + their weapon type. Everything else is secondary.
Conclusion
This new Call of Duty map is built for intelligent play. It rewards map knowledge, team coordination, and weapon discipline while punishing randomness and indecision. Master the layout, learn the rotations, and practice your utility usage. Whether you’re chasing a ranked ladder climb or preparing for competitive tournaments, the fundamentals remain constant: control the center, communicate clearly, and execute your plan with precision.
The meta will evolve as patches roll out and the competitive community finds exploits. Stay updated through resources like GameSpot for balance patches and Game Informer for meta breakdowns. In the meantime, hours spent learning this layout now will pay dividends for months to come. Drop in, practice the strategies outlined here, and watch your performance climb.